
🔗 First time playing with OpenBSD
A list of notes on my first experience with OpenBSD:
* It wasn’t obvious at first which file to download, navigating their FTP site. I ended up with cd58.iso, which was the right choice. A tiny 7.8MB ISO!
* As soon as I typed “OpenBSD” as the VM name in VirtualBox, it gave me OpenBSD defaults. It defaulted to 64MB of RAM (only!), but I chose 256M, and the default 2G disk image.
* The first boot gave me a few options, including “Install” and “Autoinstall”. I chose “Autoinstall” since I thought that would install with the defaults, but it looked for an installation script in the local network (and obviously didn’t find it). Reboot, “Install” and off we go.
* No Dvorak options in the list of keyboards in the installer.
* I went with the default options and installed all offered packages (it offered me a list of coarse-grained bundles). It asked me about creating users, partitions, configuring network and if I wanted to run sshd by default.
* To enable Dvorak, the internet told me to do kbd us.dvorak nice.
* To make it permanent, I just grepped /etc for kbd and found out that cat us.dvorak > /etc/kbdtype would suffice.
* To install things, become root and then use pkg_add. For example: pkg_add wget
* By default it includes df but not free.
* To get color in the terminal, set TERM=wsvt25. htop showed in its usual colors!
* The default PATH includes the current (.) directory! Take that, Linux status quo!
* iconv is installed under /usr/local, and its library exports symbols with names such as libiconv_open instead of the usual iconv_open, which fools the typical AC_CHECK_LIB test in Autoconf. (In the source code, iconv_open works, so I guess iconv.h uses #define to translate the name. Added a hack to Dit to make it build cleanly out-of-the-box.
🔗 htop 2.0 released!
This week I finally released htop 2.0.0!
- htop-2.0.0.tar.gz
MD5 06f76c7d644ce8ae611c9feb10439a30SHA-256 d15ca2a0abd6d91d6d17fd685043929cfe7aa91199a9f4b3ebbb370a2c2424b5
What’s new in htop 2.0
Since version 2.0, htop is now cross-platform!
Check out the video and slides of my presentation at FOSDEM 2016
about how this came to be. This release includes code supporting Linux, FreeBSD, OpenBSD and Mac OS X.
There are also, of course, some new features:
- If you’re using NCurses 6, htop will also support your mouse wheel for scrolling.
- Moving meters and columns around in the setup screen is a lot more comfortable now.
- You can now press “e” to see the set of environment variables for a process.
- The “graph” mode for meters was revamped, inspired by James Hall’s vtop.
…And of course, lots of other tweaks and fixes!

Changelog
The changelog with the main new changes follows below. Special thanks
to everyone who contributed for this release, through bug reports, bug
fixes, new features and financial support for the platform abstraction
layer project!
- Platform abstraction layer
- Initial FreeBSD support
- Initial Mac OS X support
(thanks to David Hunt) - Swap meter for Mac OSX
(thanks to Ștefan Rusu) - OpenBSD port
(thanks to Michael McConville) - FreeBSD support improvements
(thanks to Martin Misuth) - Support for NCurses 6 ABI, including mouse wheel support
- Much improved mouse responsiveness
- Process environment variables screen
(thanks to Michael Klein) - Higher-resolution UTF-8 based Graph mode
(Thanks to James Hall from vtop for the idea!) - Show program path settings
(thanks to Tobias Geerinckx-Rice) - BUGFIX: Fix crash when scrolling an empty filtered list.
- Use dynamic units for text display, and several fixes
(thanks to Christian Hesse) - BUGFIX: fix error caused by overflow in usertime calculation.
(thanks to Patrick Marlier) - Catch all memory allocation errors
(thanks to Michael McConville for the push) -
Several tweaks and bugfixes
(See the Git log for details and contributors!)
🔗 David Bowie in 1999 on the cultural impact of the internet

It’s impressive to see David Bowie’s foresight on the cultural impact of the internet back in 1999, and how the interviewer was completely oblivious to it:
« Bowie: [When I was really young,] it still produced sighs of horror from people when you said “I’m in rock’n'roll”. Now it’s a career opportunity. And the internet now carries that flag, from the subversive and possibly rebellious, and chaotic, and nihilistic… Forget about the Microsoft element: the monopolies do not have a monopoly — maybe on programs.
Interviewer: What you like about it is that anyone can say anything, or do anything?
Bowie: From where I am, by virtue of the fact that I am a pop singer and writer, I really embrace the idea that there’s a new demystification process going on between the artist and the audience. If you look back at this last decade, there hasn’t been a single entity, artist or group that personified or became the brand of the 90s. It started to fade in the 80s… in the 70s there were definitely such artists, in the 60s… the Beatles, and Hendrix… in the 50s there was Presley.
Now it’s sub-groups, it’s genres: it’s hip-hop, it’s girl-power, it’s a communal kind of thing. It’s about a community, it’s becoming more and more about the audience. Because the point of having someone who led the forces has dissapeared, because the vocabulary of rock is too well-known. It’s a currency that is not devoid of meaning anymore, but it’s become only conveyor of information, not a conveyor of rebellion, and the internet has taken on that, as I said. So I find that a terribly exciting era.
So, from my standpoint, being an artist, I’d like to see what the new construction is between artist and audience. There is a breakdown, personified I think about rave culture, where the audience is at least as important as the person who is playing at the rave. It’s almost like the artist is to accompany the audience and what the audience is doing. And that feeling is very much permeating music. And permeating the internet. »
🔗 String interpolation in Lua
Lua is known for having a very lean standard library, and for providing mechanisms to do things instead of a ton of features.
String interpolation isn’t available out of the box, but doing it in Lua isn’t a new trick. In fact, the manual includes it as an example of string.gsub:
local t = {name="lua", version="5.3"}
x = string.gsub("$name-$version.tar.gz", "%$(%w+)", t)
--> x="lua-5.3.tar.gz"
This applies to members of a table only, though. Python is introducing a general string-interpolation syntax:
a = "Hello"
b = "World"
f"{a} {b}"
f"{a + ' ' + b}"
Given that Lua supports the f"str" syntax for functions with a single string argument, I thought it would be nice to put its Lua-provides-the-mechanisms ethos to test by trying to write my own Python-like f-string formatter.
And here it is, in all its 28-line glory (and I went for readability, and not to write it as short as possible):
function f(str)
   local outer_env = _ENV
   return (str:gsub("%b{}", function(block)
      local code = block:match("{(.*)}")
      local exp_env = {}
      setmetatable(exp_env, { __index = function(_, k)
         local stack_level = 5
         while debug.getinfo(stack_level, "") ~= nil do
            local i = 1
            repeat
               local name, value = debug.getlocal(stack_level, i)
               if name == k then
                  return value
               end
               i = i + 1
            until name == nil
            stack_level = stack_level + 1
         end
         return rawget(outer_env, k)
      end })
      local fn, err = load("return "..code, "expression `"..code.."`", "t", exp_env)
      if fn then
         return tostring(fn())
      else
         error(err, 0)
      end
   end))
end
It works just like the Python example:
a = "Hello"
b = "World"
print(f"{a} {b}")
Unlike the one-liner from the Lua manual, it also works with local variables:
local c = "Hello"
local d = "World"
print(f"Also works with locals: {c} {d}")

do
   local h = "Hello"
   do
      local w = "World"
      print(f"Of any scope level: {h} {w}")
   end
end
Some more demos:
print(f"Allows arbitrary expressions: one plus one is {1 + 1}")

local t = { foo = "bar" }
print(f"And values: t.foo is {t.foo}; print function is {_G.print}")

local ok, err = pcall(function()
   print(f"This fails: { 1 + } ")
end)
print("Errors display nicely: ", err)
If there’s interest, I can make this a module in LuaRocks (probably calling it .F rather than f)
Update! This is now available in LuaRocks as a module! Install it with:
luarocks install f-strings
More info at the f-strings GitHub page. Enjoy!
🔗 How to make a pull request on GitHub - a quick tutorial
So you made changes to a project — a bugfix or maybe a new feature — and you want to send it for inclusion in the official (“upstream”) sources. Perhaps you sent an email or opened an issue in the bugtracker, and the project maintainers asked you to send a Pull Request (PR) on GitHub. But how to do this? Here’s a quick how-to guide!
Step 0 - Have a GitHub account
Before anything, you need to have a GitHub account! If you don’t have one already, go to github.com and sign up. Just follow the instructions, it’s easy and free.
Step 1 - “Fork the repository”
“Forking a repository” on GitHub means creating your own Git repository, which is a copy of the original.
Let’s visit a repository and fork it. Start by visiting https://github.com/hishamhm/pull-request-tutorial
In the upper-right there’s a button named “Fork”. It also shows a number: how many times this repository was forked by other people).
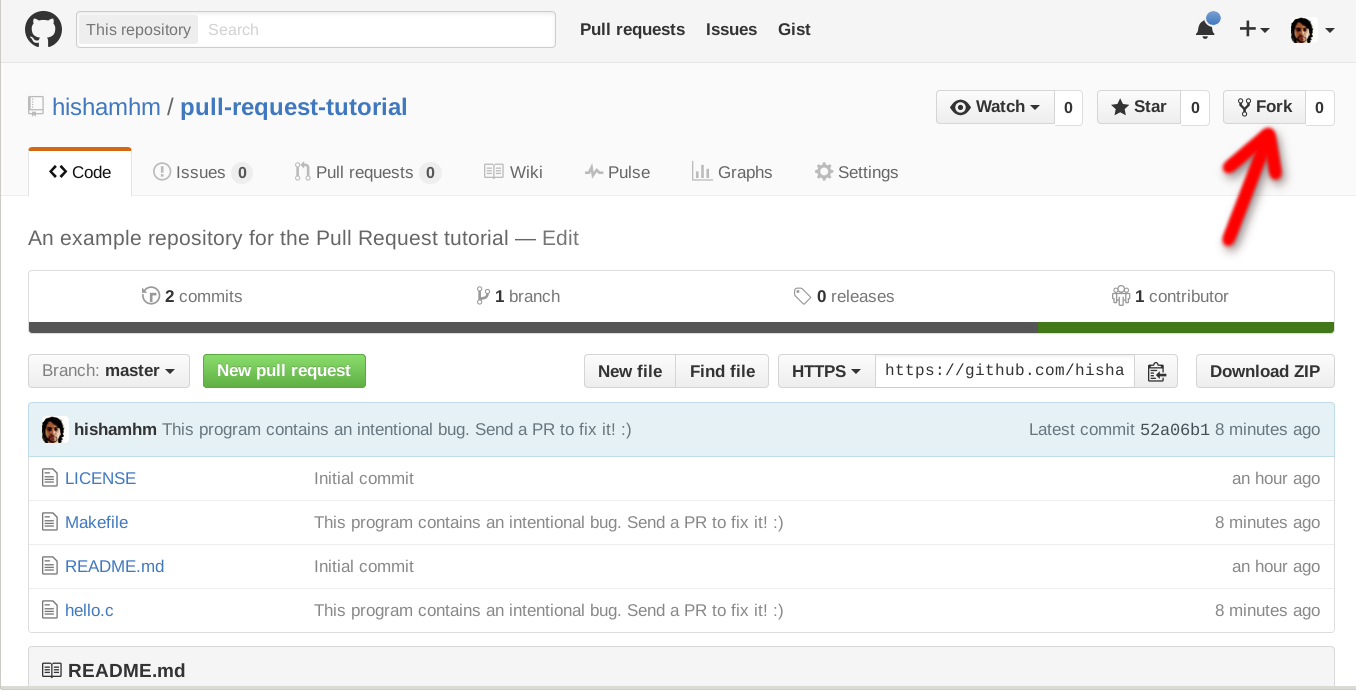
Press it, and it will create your own copy of the pull-request-tutorial repository, at https://github.com/YOUR_USERNAME/pull-request-tutorial (the real URL will, of course, contain your own username).
Step 2 - Download your fork and create a branch
Now, it’s time for you to make your changes in the source code (your bugfix or new feature). Start by downloading your repository to your computer. Go to the terminal, make sure git is installed in your computer and type:
git clone https://github.com/YOUR_USERNAME/pull-request-tutorial.git
This will download the files and create a directory called pull-request-tutorial that is linked to your fork (i.e. the copy of the repository under your control).
To avoid trouble later, let’s create a new “branch” in our repository so that the work on our bugfix or feature is stored separately. Pick a meaningful name that represents the changes you plan to make in your code. In our example, I’ll call it “fix-typo”:
git checkout -B fix-typo
Step 3 - Make your changes in your fork
Now enter the directory of your local fork, and edit it at will, implementing your bugfix or feature.
If you create a new file, remember to add it with git add:
git add new_file.txt
Commit your changes, adding a description of what was added. If you’re not used to Git, the simplest way is to commit all modified files and add a description message of your changes in a single command like this:
git commit -a -m "Fix typo in README file"
(But there are lots of ways to choose which files (and even parts of files) do commit and edit the commit message. Look for the Git documentation for details.)
Once your changes are committed, “push” the changes: send them to your GitHub repository using git push
git push
(The first time you push from a branch, Git will complain that your local branch in your computer is not connected to a branch in the GitHub server. Just do what the command tells you to do:
git push --set-upstream origin fix-typo
Next time you push again to this repository, just “git push” will do fine.)
Now, when you visit https://github.com/YOUR_USERNAME/pull-request-tutorial again, you should see your changes there.
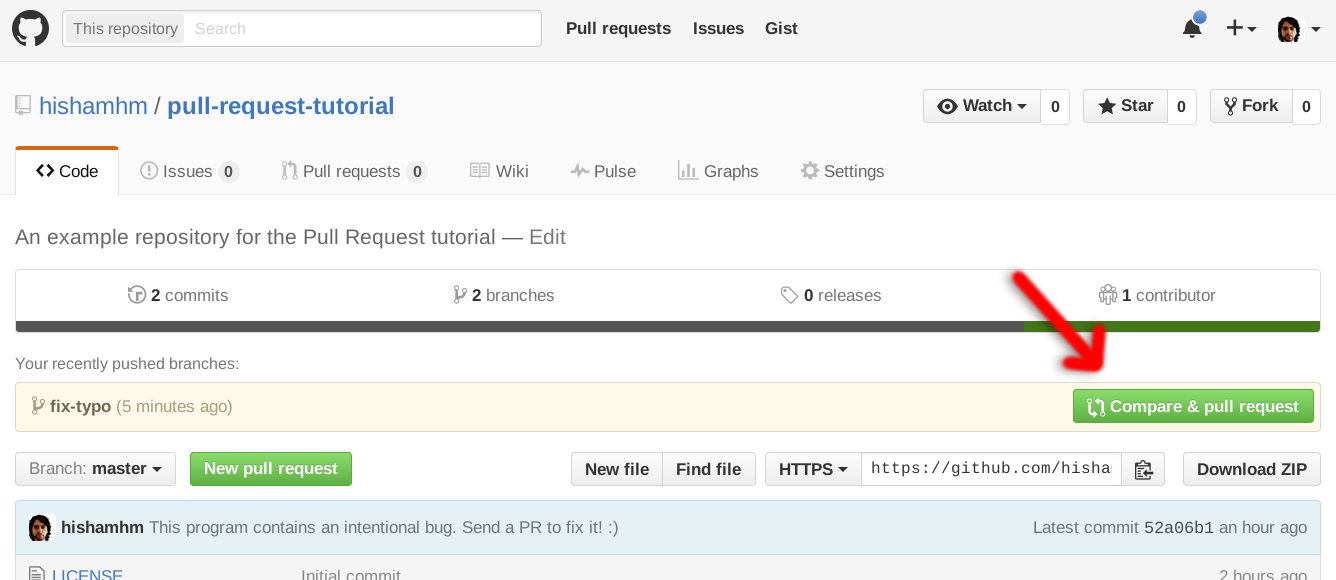
Step 4 - Make the Pull Request
This is the simplest step! In your repository page, the next time you open the page after pushing to a new branch, there’s a big green button saying “Compare & pull request”. Press it!
This will open a page in which you’ll be able to further edit the description for your proposed changes. Write down a nice report explaining why these changes should be included in the official sources of your project, and then confirm.
The project authors will receive an email notification that you sent them a PR. Then it’s their turn to read it and comment. You will get notifications when they comment. If they suggest any changes to your bugfix or feature, go back to Step 3, edit it and push again: your Pull Request will be automatically updated. If they are happy with the changes and want to integrate your contributions to the project, the maintainers will click “Merge” and your code will become part of the original repository!
If you want to give it a try, feel free to use the repository I created for this tutorial: https://github.com/hishamhm/pull-request-tutorial
Fork it, edit it, commit and push your changes and send me a PR!
If you liked this tutorial, leave a star on its repo. :)
Follow
🐘 Mastodon ▪ RSS (English), RSS (português), RSS (todos / all)
Last 10 entries
- Aniversário do Hisham 2025
- The aesthetics of color palettes
- Western civilization
- Why I no longer say "conservative" when I mean "cautious"
- Sorting "git branch" with most recent branches last
- Frustrating Software
- What every programmer should know about what every programmer should know
- A degradação da web em tempos de IA não é acidental
- There are two very different things called "package managers"
- Last day at Kong